Build a High-Converting Online HTML Quiz for Lead Generation
Learn to build an online HTML quiz that captures leads. This guide covers structure, styling with CSS, JavaScript logic, and deployment for peak performance.
An online HTML quiz is a seriously powerful way to generate leads, built with the standard trio of web tech: HTML, CSS, and JavaScript. Forget static downloads. These quizzes pull users in, ask them questions, and offer up personalised results in exchange for an email address.
It’s a simple, yet brilliant, value exchange.
Why Quizzes Are a Lead Generation Powerhouse
 Before we jump into the nuts and bolts of building one, it's important to get the "why" straight. Why bother with a quiz when you could just offer a PDF guide?
It all comes down to a shift from passive consumption to active participation. A PDF download is a one-way street. A quiz, on the other hand, kicks off a genuine two-way conversation with your audience.
This isn't just about entertainment. It fundamentally changes the kind of data you're collecting. Instead of just snagging an email, you're gathering priceless zero-party data—information people intentionally and proactively share with you.
Capturing Actionable Zero-Party Data
Every single answer a user gives is a breadcrumb, a piece of self-disclosed intel about their needs, their headaches, and what they’re looking for. This stuff is the gold standard for lead qualification because it comes straight from the source. No guesswork involved.
Just think about the possibilities:
- Hyper-Targeted Segmentation: You can automatically sort leads into different buckets based on their quiz answers. For a practical example, a software company can funnel "beginner" leads into an onboarding sequence while sending "advanced" users straight to a demo invite.
- Sky-High Lead Quality: The quiz itself acts as a filter. By the time someone finishes it, they're far more invested and qualified than a person who just clicked a download link. This self-selection process cleans up your pipeline big time.
- Seriously Personalised Follow-Up: With all this quiz data, your sales and marketing teams can craft follow-ups that actually resonate. An email starting with, "Since you mentioned you're struggling with X..." hits a lot harder than a generic "Thanks for subscribing!" message.
Quizzes transform lead generation from a simple data-grab into a data-rich diagnostic tool. You aren't just getting a contact; you're getting a detailed profile of a potential customer's exact situation.
Boosting Engagement and Conversions
Quizzes are just more fun. People are curious. We love learning about ourselves, which is why a well-designed quiz feels less like a marketing ploy and more like a genuinely helpful, personalised experience. You can see this psychology in action by looking at what makes a fun personality quiz so irresistible.
Of course, to make your quiz a true lead-gen machine, you need to apply some solid conversion rate optimization best practices. Every little detail, from the quiz title to the final call-to-action, has to be fine-tuned to guide the user towards converting.
Ultimately, building an online HTML quiz is about creating a fair trade. The user gives you their information, and in return, they get personalised insights, a tailored solution, or a clearer understanding of their problem. That’s how you build trust from the very first click.
Laying the HTML Foundation for Your Quiz
Before your quiz can wow anyone with slick animations or clever scoring, it needs a solid skeleton. That foundation is built with HTML, and getting it right from the start saves you a world of headaches later on. A well-structured document isn't just about making things look correct; it's about ensuring your online HTML quiz is accessible, search-engine-friendly, and dead simple to manage with CSS and JavaScript.
We’re going to move past the rookie habit of wrapping everything in generic <div> tags. Sure, they’re fine for grouping things for styling, but relying on them exclusively creates a flat, meaningless structure. Instead, we’ll use semantic HTML elements that actually describe the purpose of their content to browsers and assistive tech.
This approach immediately makes your code cleaner and more readable. More importantly, it provides a much better user experience for everyone, especially those who rely on screen readers.
The Core Structure: It's Just a Semantic Form
At its heart, a quiz is really just a specialised form. That makes the <form> element the perfect container for the entire experience. It’s a clear signal to the browser that everything inside is part of an interactive control set.
Within that form, each question and its answers need to be grouped together. The <fieldset> element was practically made for this. It creates a thematic grouping of form controls, which is a perfect description of a single quiz question.
To take it a step further, you can drop a <legend> tag inside each <fieldset>. The <legend> acts as a caption or title for its group, making it the ideal spot for the question text itself.
This semantic hierarchy is incredibly powerful:
- Accessibility: Screen readers announce the start of a
<fieldset>and read its<legend>, giving visually impaired users clear context for the set of options they’re about to hear. - Styling: It gives you natural hooks for CSS. You can easily style each question block by targeting the
fieldsetelement without littering your code with extra classes. - Logic: It makes manipulating the quiz with JavaScript far more straightforward, as you can loop through each
fieldsetas a self-contained question.
Connecting Labels and Inputs the Right Way
One of the most critical parts of form accessibility is correctly linking labels to their inputs. The <label> element is non-negotiable. Clicking on a label should immediately focus or select its input—a massive usability win, especially on mobile with its tiny touch targets.
To make this happen, every <input> (like a radio button or checkbox) needs a unique id attribute. The <label> then uses a for attribute that matches that id. Simple as that.
This explicit pairing between a
<label>'sforattribute and an<input>'sidis the most robust way to link them. It creates an unambiguous connection that assistive technologies and browsers understand perfectly, ensuring your online HTML quiz is usable for all.
Avoid the temptation to just wrap the input inside the label. While it might seem to work visually, it's less reliable for accessibility and can cause some weird behaviour in certain browsers. Always stick with the for and id pairing. If you're curious about other ways to build interactive elements, our guide on choosing a quiz creator online dives into various tools and their underlying structures.
Embedding Scoring Logic with Data Attributes
A smart way to handle scoring is to embed that information right into the HTML using custom data attributes. This decouples your scoring logic from your script, making it easier to manage. These attributes, which always start with data-, let you store extra information on standard HTML elements.
For our quiz, we can add a data-score="10" or data-category="A" attribute to each answer's input tag.
Here's a practical example of what an answer option might look like:
<input type="radio" id="q1a1" name="question1" value="a" data-score="10">
<label for="q1a1">Answer Option 1</label>
When a user makes a selection, your JavaScript can easily read this data-score value from the chosen input. This makes it way easier to update or change scores down the line—you just edit an HTML attribute instead of digging through JavaScript code.
Getting this foundation right sets the stage for a quiz that is robust, maintainable, and seriously effective.
Bringing Your Quiz to Life with CSS and JavaScript
Okay, the HTML foundation is solid. You’ve basically built the skeleton of your quiz. Now it’s time for the fun part: adding the personality and the brains with CSS and JavaScript. This is the step where your static page transforms into a smooth, interactive experience that actually feels like a proper quiz, not just a glorified form.
Styling isn't just about making things look pretty. Good design is functional. It guides the user, reduces friction, and quietly encourages them to click that next button. JavaScript is the engine under the hood, handling the question flow, tallying scores, and making the whole thing feel alive and responsive.
Styling for an Experience, Not Just a Page
How your quiz looks has a massive impact on whether people will actually finish it. A cluttered, confusing design screams "abandon ship," while a clean, modern interface builds trust and makes the process feel effortless.
First things first, get your brand’s visual language in order—your colours, fonts, and spacing. But a few quiz-specific elements need special attention if you want that polished, professional feel.
A progress bar is non-negotiable. Seriously. It’s a powerful psychological trick that shows users how far they’ve come and how close they are to the finish line. It turns a long list of questions into a manageable, game-like challenge. A simple container <div> with an inner <div> that you manipulate with JavaScript is all it takes.
/* Simple CSS for a progress bar */
.progress-container {
  width: 100%;
  background-color: #e0e0e0;
  border-radius: 4px;
  margin-bottom: 20px;
}

.progress-bar {
  width: 0%; /* JS will update this */
  height: 10px;
  background-color: #00c27a;
  border-radius: 4px;
  transition: width 0.4s ease-in-out;
}
Button states are another one of those small details that make a huge difference. Your users need instant feedback. They need to know their click registered. Make sure your "Next" and "Previous" buttons have distinct styles for their default, hover, and active states.
- :hover: Change the background colour or add a subtle shadow. Show them it’s clickable.
- :active: Briefly make the button darker or smaller the exact moment it's clicked. This confirms the action.
- :disabled: Grey it out or lower the opacity when an answer hasn't been selected yet. This prevents confusion and errors.
A well-styled quiz feels like a professional application, not just a web page. When you nail the details like progress bars and button feedback, you create an intuitive flow that keeps users moving forward with confidence.
Making It Work on Any Device
A huge chunk of your audience is going to take your quiz on their phone, probably while waiting in line for coffee. A non-responsive design isn’t just bad; it’s a deal-breaker.
This is where CSS media queries save the day. The "mobile-first" approach is almost always the smartest way to go. Design the single-column layout for a small screen first. Once that looks great, use min-width media queries to expand the layout for larger screens, maybe shifting to a two-column grid on a desktop.
/* Mobile-first styling */
.quiz-container {
  width: 90%;
  margin: 0 auto;
}

/* Styles for tablets and larger */
@media (min-width: 768px) {
  .quiz-container {
    max-width: 700px;
  }
  .answer-options {
    display: grid;
    grid-template-columns: 1fr 1fr;
    gap: 15px;
  }
}
This way, you guarantee a solid, usable experience for everyone, no matter what device they’re on.
100% Free Lead Magnet Audit
Our AI analyzes your website and delivers custom growth strategies in seconds.
Managing the Flow with JavaScript
If CSS is the personality, JavaScript is the brain. It's the logic that drives the entire interaction, keeping track of which question is active, which answers have been selected, and when it’s time to show the results.
The gold standard for quiz UX is showing one question at a time. It keeps the user focused and prevents them from feeling overwhelmed by a massive wall of questions. The easiest way to do this is to hide all your question <fieldset> elements with CSS by default, and then only show the first one.
When the user clicks "Next", your JavaScript needs to do a few things in sequence:
- Check for an answer. Don't let them move on without selecting an option.
- Hide the current question. A simple way is to add a
.hiddenclass. - Show the next one. Just remove that same
.hiddenclass from the nextfieldset. - Update the progress bar. Recalculate the completion percentage and adjust the width of your progress bar element.
Here's a bare-bones JavaScript snippet that shows this core logic in action.
const nextButton = document.getElementById('next-btn');
const questions = document.querySelectorAll('fieldset');
let currentQuestionIndex = 0;

nextButton.addEventListener('click', () => {
  // Add validation logic here to make sure an answer is selected

  // Hide current question
  questions[currentQuestionIndex].classList.add('hidden');

  // Move to the next question
  currentQuestionIndex++;

  // Show the new current question if it exists
  if (currentQuestionIndex < questions.length) {
    questions[currentQuestionIndex].classList.remove('hidden');
  } else {
    // We're at the end, so show the results
    showResults();
  }
});
This controlled, step-by-step progression is what creates a smooth and engaging journey. By combining thoughtful CSS with sharp JavaScript logic, you take your quiz from a static HTML document to a powerful lead generation tool that people actually enjoy using.
Making It All Work: Scoring Logic and Lead Capture
Alright, you've built the structure and styled it. Now for the crucial part: making your quiz actually do something. This is where we wire it up to turn those clicks into valuable data. We're shifting gears from looks to logic, focusing entirely on the JavaScript that powers the scoring, segments your audience, and ultimately, captures those high-intent leads.
The secret sauce here is the data-* attributes we embedded in the HTML. By storing the score values right there in the markup, our JavaScript stays lean and clean. It doesn't need to be cluttered with hard-coded values. This makes future tweaks a breeze – changing the points for an answer is a quick HTML edit, not a deep dive into the code.
Tallying Up the Final Score
Let's begin with a simple system to calculate the user's score. The concept is straightforward: we'll create a variable, maybe call it totalScore, and set it to zero. Every time a user answers a question and hits "Next," our script will grab the selected answer, read its data-score, and add it to the running total.
Here’s a practical JavaScript snippet to show you how that looks for a single question:
// This function runs when the user clicks the 'Next' button
function processAnswer() {
  const currentQuestion = document.querySelector('fieldset:not(.hidden)');
  const selectedAnswer = currentQuestion.querySelector('input[name^="question"]:checked');

  if (selectedAnswer) {
    // Read the data-score attribute, turn it into a number, and add it up
    const score = parseInt(selectedAnswer.dataset.score, 10);
    totalScore += score;
  }
}
This little function finds the question the user is currently looking at, identifies their chosen answer, and updates the score. Run this logic after each question, and by the end of the quiz, you’ll have a final score ready to go.
When and How to Ask for the Email
The single most critical moment in this whole process is right after the final question but before revealing the results. The user is at peak curiosity. They’ve invested their time and are dying to see their outcome. This is your golden opportunity to present the lead capture form.
Don't just slap a pop-up on the screen. Instead, make the form feel like the natural next step. A simple headline like "See Your Personalised Results!" frames the email submission as the key to unlocking the value they've been working towards, not as a gate.
Gating the results behind a form is a time-tested way to skyrocket conversions. The user's curiosity is maxed out, making them far more willing to trade their contact info for the personalised insights they've just earned.
If you’re looking for inspiration, it's always smart to see what's working for others. Check out these high-converting lead generation form examples to get some ideas.
Delivering Personalised Results
Once they've submitted their details, it's payoff time. The results page needs to be more than just a number. This is where you use that totalScore to segment users and deliver feedback that feels personal and genuinely helpful.
You can pull this off with some basic conditional logic in your JavaScript.
- Set Your Score Buckets: Decide on the ranges for your outcomes. For instance, 0-30 points could be 'Beginner', 31-60 'Intermediate', and 61+ 'Advanced'.
- Prep Your Result Blocks: In your HTML, create different
divelements for each potential result. Keep them hidden with CSS for now. - Show the Right Outcome: Use JavaScript to check the
totalScoreagainst your buckets and then reveal the one that matches.
This whole flow, from the initial interaction to the final lead capture, can be visualised pretty clearly.
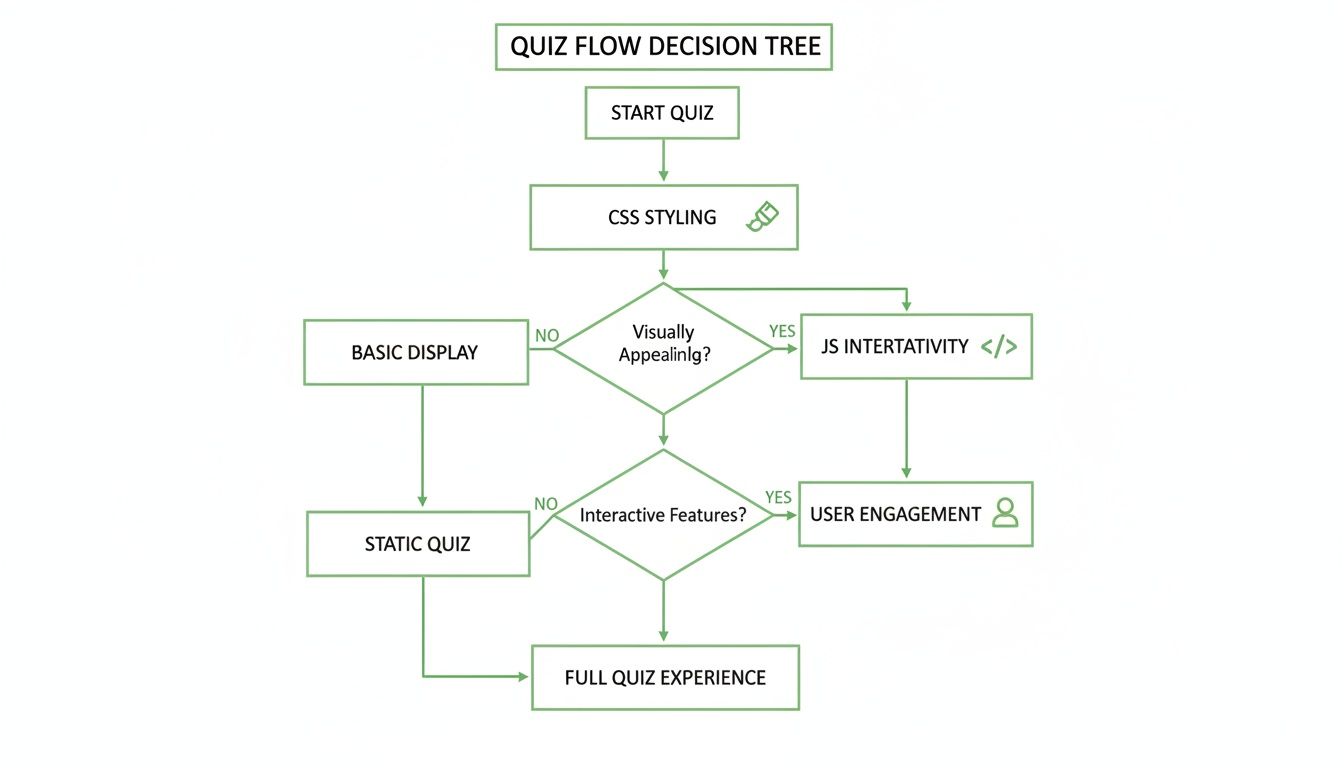
The flowchart drives home a key point: CSS and JavaScript aren't separate, sequential steps. They're intertwined processes that work together to create an engaging experience that ultimately drives conversions.
Getting Your Quiz Live and Ready for Leads
Building your quiz is a massive step, but the real magic starts when you push it live. This is the part where your code turns into an actual lead-generating machine. You're about to connect your creation with a real audience and see how it performs in the wild.
Getting your HTML quiz onto your website is pretty straightforward. You've got a couple of solid options, and the best one usually depends on how much control you want and where you plan to put it.
Embedding Your Quiz on Your Website
Here are the two most common ways to get this done. Both work great, but one will likely fit your setup better.
Direct Code Integration: This is exactly what it sounds like. You copy your HTML, CSS, and JavaScript straight into your website's source code or a specific page template in your CMS. This gives you the tightest possible integration, letting the quiz blend seamlessly with your site's existing styles. It's the best option if you want the quiz to feel like a native part of your website.
Using an iframe: An
<iframe>basically opens up a little window on your page that loads a separate HTML document—your quiz. You host the quiz files on their own, then pop them into your page with a simple tag:<iframe src="your-quiz-url.html"></iframe>. This is a fantastic way to keep the quiz's code totally separate from your main site, which means no nasty style or script conflicts. It's a clean, self-contained approach.
No matter which path you take, the goal is to make the quiz impossible to miss. It needs to live on a dedicated, high-traffic page, like a popular blog post or a purpose-built landing page. For more on that, check out our guide on the key elements of a best practice landing page.
Where you put your quiz is just as important as the quiz itself. A brilliant quiz buried on some forgotten corner of your site isn't going to generate a single lead. Make it the star of the show.
It's All About Speed
We live in a world of zero patience. A slow-loading quiz will have people bouncing before they even see the first question. Performance isn't just a nice-to-have; it's absolutely critical for conversions.
One of the easiest wins here is minification. This is a process that strips out all the junk from your code—things like whitespace, comments, and line breaks—without affecting how it works. The result? Much smaller CSS and JavaScript files that browsers can download and process way faster.
You can find tons of free online tools and build-process plugins (like Terser for JavaScript or csso for CSS) that will automate this for you. It’s a simple step that can shave precious seconds off your load time and keep more users engaged.
Tracking What Actually Works
You can't fix what you don't measure. Setting up some basic analytics is non-negotiable if you want to understand how people are actually interacting with your quiz and where you can improve it. This is how you start proving its value with hard data.
Using a tool like Google Analytics, you can set up conversion goals to track the important stuff. The single most important metric you need to watch is the quiz completion rate. Just track how many people start the quiz versus how many successfully submit the lead form at the end.
This one number tells you almost everything you need to know about how engaging your quiz is. If your completion rate is in the gutter, it could mean the questions are too hard, the quiz is too long, or maybe there's a bug on question 4. By keeping an eye on this, you can pinpoint exactly where people are dropping off and start fixing the leaks.
If you want to diagnose why your current lead magnets aren't converting, consider using a tool like Magnethive. It generates a comprehensive report with three AI-powered lead magnet ideas and shows the potential ROI impact, all for free.
Got Questions About Your HTML Quiz? I've Got Answers.
As you get ready to launch your quiz, a few common questions always seem to pop up. These are the little hurdles that can trip you up right before the finish line. Let's tackle them head-on so you can get your lead generation machine up and running smoothly.
How Do I Make My HTML Quiz Work on Phones?
Look, if it doesn't work on mobile, it doesn't work at all. Making your quiz responsive isn't a "nice-to-have"; it's everything. The secret is to design for the smallest screen first. Seriously. This mobile-first approach forces you to nail the core experience before you worry about fancy desktop layouts.
Once your mobile view is solid, you can use CSS media queries with min-width to layer on styles for tablets and desktops. Use flexible units like percentages (%) for your containers and always slap a max-width: 100% on your images so they don't break your layout. For the heavy lifting, CSS Flexbox and Grid are your best friends—they let you build complex, responsive structures with clean, minimal code.
What's the Best Way to Store Leads Without a Backend?
So you don't have a server to handle form submissions? No problem. You can still capture leads like a pro by plugging directly into third-party services. Most email marketing platforms like Mailchimp or ConvertKit offer pre-made HTML form snippets. You just copy and paste their code into your quiz's final step.
When a user hits "submit," their info goes straight to that service's servers. Your own backend does zero work. If you need something a bit more powerful, look into integration platforms like Zapier. It can "catch" the form data and then fire it off to pretty much anywhere—a Google Sheet, your CRM, you name it. It's incredibly flexible and saves you the headache of managing a server.
Can I See Where People Are Dropping Off in My Quiz?
Absolutely, and you'd be crazy not to. This is where you separate the amateurs from the pros. Using a web analytics tool like Google Analytics, you can fire off custom JavaScript events to see exactly how far people get.
For example, you could send an event like question_3_complete every time a user moves to the next question.
This simple event-based tracking lets you build a funnel report in your analytics tool. You'll get a crystal-clear picture of where people are bailing, showing you which questions are killing your completion rate.
This isn't guesswork; it's a data-driven roadmap for optimisation. By finding and fixing the weak spots, you can dramatically increase the number of people who actually finish the quiz and give you their email.